Your Cart is Empty
You have no items in your cart. Shop our Mushroom Kits to add a kit to your cart. To place an order over the phone, call Mushroom Adventures at (530) 741-2437 between 8:00 AM and 5:00 PM PST or Contact us online.
530-701-9700
E-mail: Donald@mushroomadventures.com
Mushroom Adventures, 11107 Highway 70, Marysville, CA 95901
See an Instructional Video a customer put together for us.
This mushroom growing kit was designed to let you grow mushrooms at home. It contains all the necessary components to grow several crops of mushrooms over an 8 to 12 week period of time. The mushroom compost has already been prepared and inoculated with the white colored mushroom mycelium (A moldy looking fungus) at the mushroom farm. All you need to do is follow the instructions below and you should have weeks of fun and enjoyment as you harvest one mushroom after another.
Depending on the mushroom variety, the first of the mushrooms are ready to be picked within 3 to 5 weeks after starting the mushroom growing kit. Generally the first crop of mushrooms is the largest, consisting of 35 to 60% of the fruiting mushrooms. Each crop thereafter usually becomes smaller; fruiting fewer and fewer mushrooms, until the kit stops. The mushroom crop fruits at intervals of approximately 10 to 30 days, temperature and variety of mushroom will cause this to vary somewhat. Mushrooms fruit faster at warmer temperature and slower at cooler temperatures. Mushrooms fruit at temperatures between 60 to 74 degrees F. The best quality and quantity of mushrooms are grown between the temperatures of 63 to 68 degrees F. Constant temperatures higher than 74 degrees usually prevent mushrooms from growing, and temperatures over 86 degrees for several hours can kill the mushroom mycelium (the fungus). Cooler temperatures below 55 degrees retard or stop the growth of mushrooms. Freezing temperatures will kill some mushroom varieties, but not all. The quantity of mushrooms this kit will produce will vary. The larger the size of the mushrooms the fewer of them will grow, the opposite is also true, the smaller the size of the mushroom the more of them will grow. Mushroom variety will also affect yields.
Follow all directions completely and save these instructions for later reference.
Open the box and remove these instructions and the bag of dry peat moss called casing. Leave the large bag of compost inside the box. The compost may appear brown if newly inoculated with spawn, or if it is mature, it will look frosty white or moldy, as the mushroom mycelium grows through it. If the compost is brown and newly inoculated, close the kit up and keep it at 70 degrees for 7-10 days, before adding the peat moss casing layer. You will notice that the bag of compost is not sealed closed this is to allow the mushroom fungus to breathe. If you do not plan on starting the kit immediately, simply fold the plastic bag back down on to itself and close up the box the way it was before you opened it. This kit is designed to be started immediately, a short delay of a week or two is OK, a delay of a month or more is to long and not a good idea. It may still grow, but fewer mushrooms will be produced the longer you wait. If you wish to delay, starting your kit for a few weeks, store the kit below 50 degrees F and above freezing.
Open the cardboard box and leave the box flaps pointing upward. Open the bag of compost, and pull up the excess plastic bag and leave it pointing up in the air, if it does not stay up tape it to the box flaps. Inside the bag of compost is a small bag of dry peat moss mixed with a little calcium carbonate, this is called casing. Casing is used as a covering to hold water and protect the mushroom mycelium growing in the compost. Scratch the entire surface of the compost 1/2" deep. You can use a nail or fork to do this. Next open the bag of dry casing, and into the casing bag add 1/2 cup of the scratched loose compost to grow large mushrooms or 1 cup of loose compost to grow smaller average size mushrooms and 5 cups (8 oz. cups) of room temperature tap water. Mix the water, 1/2 or 1 cup of loose compost and casing together, until you have an even very wet mixture. Let the casing sit in its’ own bag for 15 minutes to absorb most of the water before applying it to the compost. (A cup of water is 8 fluid ounces.)
Now spread the wet casing evenly over the entire surface of the compost. Do not pack the casing down, leave it loose and fluffy. The casing should cover all the compost, and be approximately 1 inch deep. After applying the casing to the compost, mist or sprinkle the casing with an additional one-cup of water. Wait about 5 minutes and then scratch or ruffle the entire surface of the peat moss to a depth of ¾ inch. A nail or fork can be used to ruffle the casing. The roughness of the casing creates a microclimate where the young mushrooms can form. This completes setting up your kit. It is a good idea to write the date you start your kit on the box and on these instructions for later reference.
Now that you have finished setting up your kit, you will need to place your kit somewhere for it to grow. The best location will be a room where the temperature stays between 60 to 74 degrees F. The ideal fruiting temperature range for Portabella and White Button mushrooms is between 63 to 68 degrees F. Dense White and Almond prefer a warmer 68 to 72 degrees F. Short periods of plus or minus 4 degrees are usually OK. Your mushroom kit does not need to be kept in the dark, but under no circumstance should you allow direct sun light to shine into your mushroom kit. The sunlight can dry out, overheat, and even kill your kit. Ambient light will cause Portabella mushroom caps to become darker brown in color. White Button mushrooms exposed to ambient light will get a sight blushing of color, but will still stay whitish in color. Mushrooms grown with light or without light, will taste the same. It is also important to protect your kit from insects of all kinds that’s why an indoor location is preferable to an outdoor location. Flies and their larva, mites and slugs all love to eat mushrooms and even the mushroom mycelium. (See 10 below) It is important to leave the top of your mushroom kit open for air ventilation or no mushrooms will grow.
Once you have placed your kit somewhere to grow, make sure you keep the surface of the casing moist. A moderate spray misting or sprinkling of water on the casing surface once a day is adequate. Do not let the casing dry out, as it is very hard to remoisten it and mushrooms will not grow in dry casing. Keep your kit out of drafts and away from heat sources, which will dry out your kit. You want to keep the surface of the kit moist at all times without over watering the kit. The kit has no drainage and excessive watering will build up, flood and drown the mycelium. Give the kit enough water each day to off set evaporation. You may water more often, if the temperature is warmer than 70 degrees F. Do not cover the top of the kit to prevent the kit from drying out, as this causes air circulation problems and high levels of carbon dioxide. High levels of carbon dioxide will prevent mushrooms from growing or produce long stringy undesirable mushrooms.
Within 7 to 14 days, after placing the casing on the compost, you will notice the white mushroom mycelium beginning to grow up into the casing. Sometimes the mycelium grows through the casing and covers 20 to 30 percent of the casings surface this is OK. On day 12 to 14 after casing small ½" diameter mushrooms begin to form on the casing surface Mushrooms may grow anywhere on the casing surface, individually or in clusters. On day 17 to 21 after casing, the mushrooms will be ready to harvest if grown at 65-70 degrees temperature. Mushrooms will just about double in size every day when they are young.
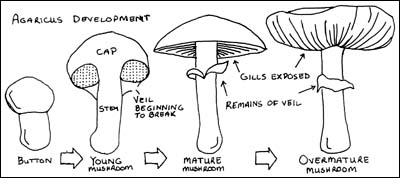
The mushrooms can be picked as buttons with closed caps or allowed to fully mature with caps open. A mushroom is mature and ready to be picked, when the thin veil covering the gills under the mushroom begins to tear open. The size of the mushroom has nothing to do with maturity; even small mushrooms should be picked when the veil tears open. To pick your mushrooms rotate them a complete turn in place and slowly pull them out of the casing, trying not to disturb the adjacent mushrooms. Do not cut the mushrooms off inside the kit, as this leaves a stem in the casing to rot. Once you have picked your mushrooms, water the casing again with 1/2 cup of water to replenish the water the mushrooms removed. In one to four weeks, depending on the mushroom variety and the temperature, another crop of mushrooms will usually appear. Be patient, most kits produce two very large crops of mushrooms and then several smaller fruiting. After picking the second crop of mushrooms, water the kit again with 1/2 cup of water and then wait for crop three.
As your kit ages, it is not uncommon to see tiny black flies and contaminant molds beginning to grow on the casing surface. The flies generally show up, if at all heaviest toward the end of the kit's life. The flies can easily be controlled, by coating the inside upper portion of the large compost bag with a thin coat of (only) vegetable cooking oil. This acts as flypaper and they stick to it. Molds usually do little immediate harm and may be left alone, until you discard your kit. Just because a few contaminants show up, don’t rush to discard your kit wait a while to be sure no further mushrooms will grow.
Your kit contains a fixed amount of mushroom nutrients, when these are used up; the kit will stop producing mushrooms and become idle. In time the mushroom mycelium slowly dies and becomes nutrients for plants. This begins around 12 weeks or later from the time you started your kit. Your kit can then be recycled by, adding it to your compost pile or mixing it into your garden for fertilizer.
A natural reproductive process for mushrooms is to produce spores. Spores are produced when mushroom caps reach maturity and open, releasing spores. Most of the spores fall and stay inside or around the kit, but some do drift away. If the spores are in heavy enough concentration and close to an item they may discolor it. Clean up can usually be done by washing with soap and water. It is a good idea to place a few sheets of newspaper under the kit, and keep the kit at least two feet away from furniture or walls. By picking your mushrooms before the veil breaks or shortly after, you will reduce or eliminate the release of spores. The spores are generally harmless to humans, unless you are allergic to fungi.
Remember these instructions are general in nature, mushroom variety, growing temperatures, the age of your kit and the individual care you provide will all affect the success and productivity of your kit. Enjoy growing and eating your fresh mushrooms.